 by: John Murray
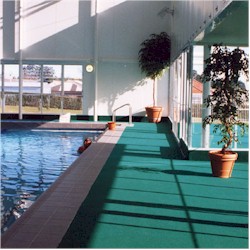
Remember the 1970s when the only choice available in indoor - outdoor carpet was that wonderful [not] golf course green turf. It's no wonder that the word outdoor carpet sends shudders down a person's spine. But those days are gone.
Today there are a wide selection of both colors and textures from the very plush to the basic. You can even choose varying grades of carpet. So all that's left to know is how to install outdoor carpet.
Before we get into how to install outdoor carpet let's have a look at the tools you'll need. 50 lb Carpet Roller - optional but well worth the rental fee because of the nice tight seal it provides.
- Utility Knife - make sure the blade is sharp
- Straight Edge
- Adhesive Spreader
- Scissors
- Tape Measure
You will require the following materials
- Double faced carpet tape
- Adhesive
- Adhesive solvent [mild]
- Seam Adhesive
- Solvent To Ensure The Surface is Clean
Some things you should be aware of.
- If you are buying outdoor carpet that is going to be prone to dampness or serious wetness be sure the carpet has an all weather marine backing that is resistant to moisture.
- Outdoor carpet can be purchased in either 6 foot or 12 foot widths.
- Sundecks or areas that get a large amount of sun should be installed using a quality outdoor carpet adhesive to ensure there are no problems with rot or mildew.
- Adhesives are flammable so do not use around open flames, cigarettes, pilot lights, or any other source of flame.
Now to the main attraction, how to install outdoor carpet
1. Prepare your surface
Make sure you have properly prepared your surface by using a solvent to remove all grime and dirt. Let it dry out completely before installing the carpet. The best conditions for installing your carpet are in a humidity range from 10% to 65%, and temperatures between 55 F and 95 F.
2. Unroll
Unroll the carpet in the location where you are going to install it. Let is sit for an hour or two to allow for expansion.
3. Tape room
Take your two sided double tape and place the tape around the outer edge of the room on the sub floor. Make sure there is no more than a 2 foot spacing between each strip of tape. Leave the protective paper on the top side of the tape so as not to loose the adhesion.
4. Center It
Next center the carpet in the room. Position it so the edges are able to curl up against the wall. Allow at least 3" on each side. You can trim excess away later.
5. Cut A Ways
Trim around protrusion and outside corner edges by making a vertical slice down the carpet. Remember cutting a corner correctly makes installing your carpet much easier.
6. Inside Corners
To fit your carpet on inside corners you need to do a V cut where it over laps. Move slow and carefully when making these cuts so that you do not cut too far.
7. Seams
If your room needs to be seamed be sure you have the pile running in the same direction so that the seam is the least noticeable. You should overlap from 2 to 3 inches.
To make a double cut seam take your straight edge and utility knife and cut through both layers at exactly the same time using the tools together.
8. Wall To Center
Start against the wall and then fold the carpet back half way but don't move the half that still down.
9. Apply Adhesive
If you are doing a permanent installation this is when you will use your adhesive [make sure the room is well ventilated]. Take a notched spreader, apply adhesive, and then apply the adhesive to the sub floor. Follow instructions on the adhesive.
10. Unroll
Now slowly roll the carpet you rolled back earlier back into place. Smooth out any bumps and make sure you've got it lined up properly. If you were careful rolling it back all should be fine.
11. Repeat
Repeat the entire process above for the other side of the room now.
12. Carpet Roller
Now take your carpet roller [if you rented one] and run it across the entire carpet to get the adhesive to properly adhere all over the carpet.
13. Trim
Now is the time to use that sharp utility knife and trim away the excess on the edges around the outside of the room. Now is the time to clip any threads you see as well so that they don't start to unravel.
14. Clean Up
Clean away any excessive adhesive using a mild solvent. Follow the instructions provided by the manufacturer.
15. Connect The Dots
Or in this case connect the rooms. If you are laying outdoor carpet in more than one room use metal binder strips to cover the join.
That's it! If you followed these how to install outdoor carpet steps you should be an outdoor carpet layer pro by now! And think of all the money you saved not having to call in the pros. So what's your next project?
Improving your home and your life only at Home Improvement Idea : http://home-improvement-idea.blogspot.com

No comments:
Post a Comment